NOTE: This website is a static copy that has been archived on KK4NDE's website June 12, 2021 with the permission of G4HFQ to preserve the content before his site is shut down.
Importing and Exporting memories
Contents
- Index
- Previous
- Next
Importing and Exporting memories
Capabilities
The Import/Export facility enables you to exchange memory information between the following radios:
FT-817, FT-847, FT-857, FT-897 (including ND and D models) - using FTBasicMMO
FT-1D, FT-60, FT-250, FT-270, FT-450, FT-950, FT-1802, FT-1807, FT-1900, FT-2800, FT-2900, FT-7800, FT-7900, FT-8800, FT-8900, VX-3, VX-8, VX-110, VX-120, VX-150, VX-170, VX-177, VR-5000 - using the FTB program written for the respective radio
VX-2, VX-5, VX-6, VX-7 - using the Commander range of software by Jim Mitchell, KC8UNJ
Memory definitions can also be imported from TravelPlus for Repeaters using .TPE files, and from ButelSoftware's ARC250.
FTB60 can import up to 999 memory definitions at a time.
The position of the Import/Export window can be saved by clicking the button 'Save size and position'. Multiple monitors are supported.
Importing
Importing is done in two phases. The first phase performs validation on the input data, and checks there is enough space to import the records. The second phase performs the actual import.
The program looks at the first record in the file (the header record) to decide how to import the data.
If you wish to prepare your own file for import using a spreadsheet such as Excel then the easy way to get the correct header information is to Export your existing memories to a .CSV file. This will include the correct format header file as well as at least one sample memory. The format of the various fields is in this Help file section 'CSV file formats'. When you have finished editing your Excel spreadsheet then save in .CSV file format.
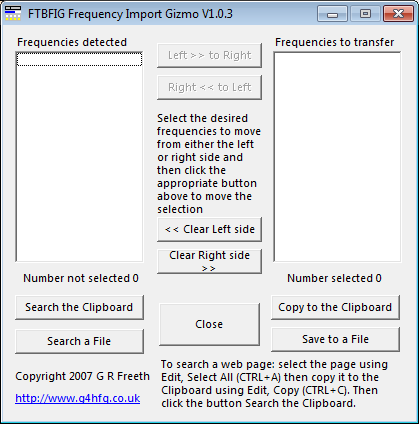
FTBFIG utility
A free utility called FTBFIG is available on the website which can extract frequencies from files or the Windows clipboard and produce .CSV files that can be imported.
Importing data validation
During the validation phase of an import there are messages produced in a re-sizeable window to document potential problems with the input data. If problems are detected then you are given the option to try to import as much of the file as possible.
Any record containing a non-supported operating mode (not FM or AM) is rejected.
Any name field containing a character that cannot be displayed on the FT60 is made blank.
Name fields are truncated to 6 characters long.
Any record containing a frequency that cannot be supported on the FT60 is rejected.
The expected format of the files is given in the Help file section CSV file formats.
Creating and Importing TravelPlus for Repeaters
For TravelPlus for Repeaters prior to Ver 7 (2003-2004)
Open the ARRL Travel Plus for Repeaters and generate a repeater listing per their instructions. From the "Repeater List" window select the "File" pull down choose "Export Repeater Data" from the selections. Alternatively you can just do a "Control + E" to accomplish the same thing. You will be prompted in the usual Windows manner for a file name.
The program is expecting TravelPlus filenames to have a suffix of .TPE
The header record (which defines the subsequent fields in the file) that the program is expecting in a .TPE file is:
"Sequence Number","Country","Region","State","Location","Output Frequency","Input Frequency","Call Sign","Repeater Notes","CTCSS Tones","Sponsor"
For TravelPlus for Repeaters 2003-2004 (Ver 7)
Produce a repeater listing as above but before exporting the file use the Export Repeater Data dialog box to define the fields to be exported:
Click the 'Select All' button
Un-tick the second field 'Band'
Un-tick the last two fields 'Distance' and 'Bearing'
In Format, select 'Comma-Separated File'
Tick 'Include Column Headings'
This will create a file suitable for reading by FTBasicMMO.
For TravelPlus for Repeaters 2007-2008 (Ver 11)
The initial V11 release had dropped the capability to create .TPE files. There is an update on the ARRL web site to re-instate this capability. You may need to choose .TPE files in the drop-down 'Files of type' in the Save dialog box in order to save as .TPE.
Produce the .TPE file as for Ver 7 above.
Creating and Importing VX2, VX5, VX6 and VX7 Commander .CSV files
To create a CSV file from Commander you need to use the File/Export to .CSV... command; then:
for VX2/VX7 Commander only tick the Use # Field checkbox.
for VX5/VX6 Commander only tick the Main Memories and Bank information checkboxes.
When exporting you also have the ability to produce your own customised format for the data. You can separate the fields with either comma or tab characters.
Import Procedure
Click the import/export button to start. The following window is shown:
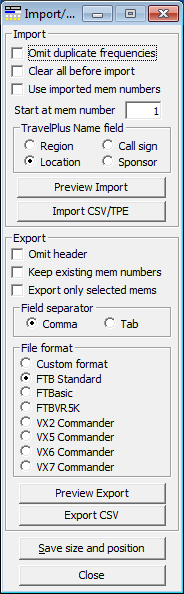
Decide whether or not you wish to omit duplicate frequencies and tick the 'Omit duplicate frequencies' check-box accordingly. If the checkbox is ticked then any import record that is already anywhere in the memories grid will be rejected.
Decide whether to completely replace any existing memories you may already have in the memory grid and tick the 'Clear all before import' check-box accordingly.
Decide whether or not you want to import into the same memory numbers as are specified in the import file and tick the 'Use imported mem numbers' check-box accordingly. Any record containing a memory number higher than the maximum for the radio will be rejected.
If you do not import using the memory numbers specified in the import file then records are placed in the first available position. The starting memory number is governed by the 'Start at mem number' field, which is initially set to 1. If you want to start importing at a particular position then enter the desired memory number.
If you are importing TravelPlus information you can choose which TravelPlus field is used for the name field. The default is Location, but you can also choose Region, Call sign or Sponsor.
If you only want to see the contents of the import file then click the Preview Import button. The file will be listed in a re-sizeable window.
When you are sure you have chosen the appropriate options click the Import CSV/TPE button and a standard open dialog box will be shown. If you are importing a TravelPlus file then change the 'Files of type' dropdown to TravelPlus files. Then navigate to the file you want to import and click the Open button.
If any potential problem is found when validating the data you will receive a message in a re-sizeable window. At the end of the validation process if there have been any messages issued you have the option to try to import the file or abandon the import. Otherwise the import proceeds.
Export Procedure
General
The first thing to do is to click the yellow Import/Export button on the main form to show the vertical Import/Export form.
File format
Decide in which format you wish to export the data by choosing one of the radio buttons. If the Custom export radio button is selected then the screen widens to show the fields that may be selected for export (example below). The author's software uses the 'FTB Standard' format except for FTBasic and FTBVR5K which have their own selectable formats.
Export options
Decide whether you wish to omit the header record that is normally produced and tick the 'Omit header' check-box accordingly. It is not usual to tick the 'Omit header' box.
Decide whether to keep the existing memory numbers in the exported records and tick the check-box accordingly. If you do not tick the 'Keep existing mem numbers' box then the first record output has the number 1 and each subsequent record is incremented by 1.
Decide whether to export all of the memories or only those that are selected by you. If the 'Export only selected mems' check-box is not ticked then all of the memories will be exported. If the check-box is ticked then you can select as many memories as you wish. To select individual memories hold down the CTRL key and then click on the memories wanted one-by-one. To reverse a selection simply click on the memory again. To select a range of memories hold down the SHIFT key and click on the first memory, then (still holding down the SHIFT key) click on the last memory. It does not matter if you have selected Empty memories - they will be ignored when the export is performed.
Field separator
Decide whether you wish to use the Comma or Tab character as the separator character between fields and select the appropriate radio button.
Export or Preview
If you only want to see the contents of the export file then click the Preview Export button. The file will be listed in a re-sizeable window.
When you are sure you have chosen the appropriate options click the Export CSV button and a standard Save as dialog box will be shown. Choose a location and enter a file name, then click the Save button.
If the checkbox 'Export only selected items' is ticked
Please note that while the check-box 'Export only selected mems' is ticked the Memories menu is disabled and complete rows of cells are selected. Normal editing of memories is resumed when the check-box is un-ticked or the Import/Export window is closed.
Example of the screen when the Custom format is chosen for export
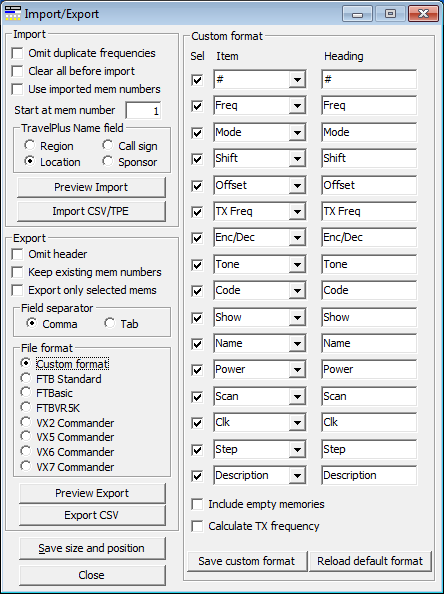
Creating your own Custom format
If you want to export only certain fields to a file in a specific sequency you can do so by using the Custom format.
Tick or un-tick the check-boxes in the Sel column until you have the desired number of fields to be output.
Use the drop-down lists to choose which fields are to be output.
Enter your own header identifier information in the Heading text boxes.
Tick the option 'Calculate TX frequency' if you want a calculated TX frequency in the exported file.
Click the Preview Export button to see if you have the desired format.
Click the Export CSV button to create and save the file.
The way in which you set up the export can be saved as your personal format to be used whenever you choose Custom by clicking the 'Save as custom format' button. To revert to the program standard format click the 'Reload default format' button.
NOTE: This website is a static copy that has been archived on KK4NDE's website June 12, 2021 with the permission of G4HFQ to preserve the content before his site is shut down.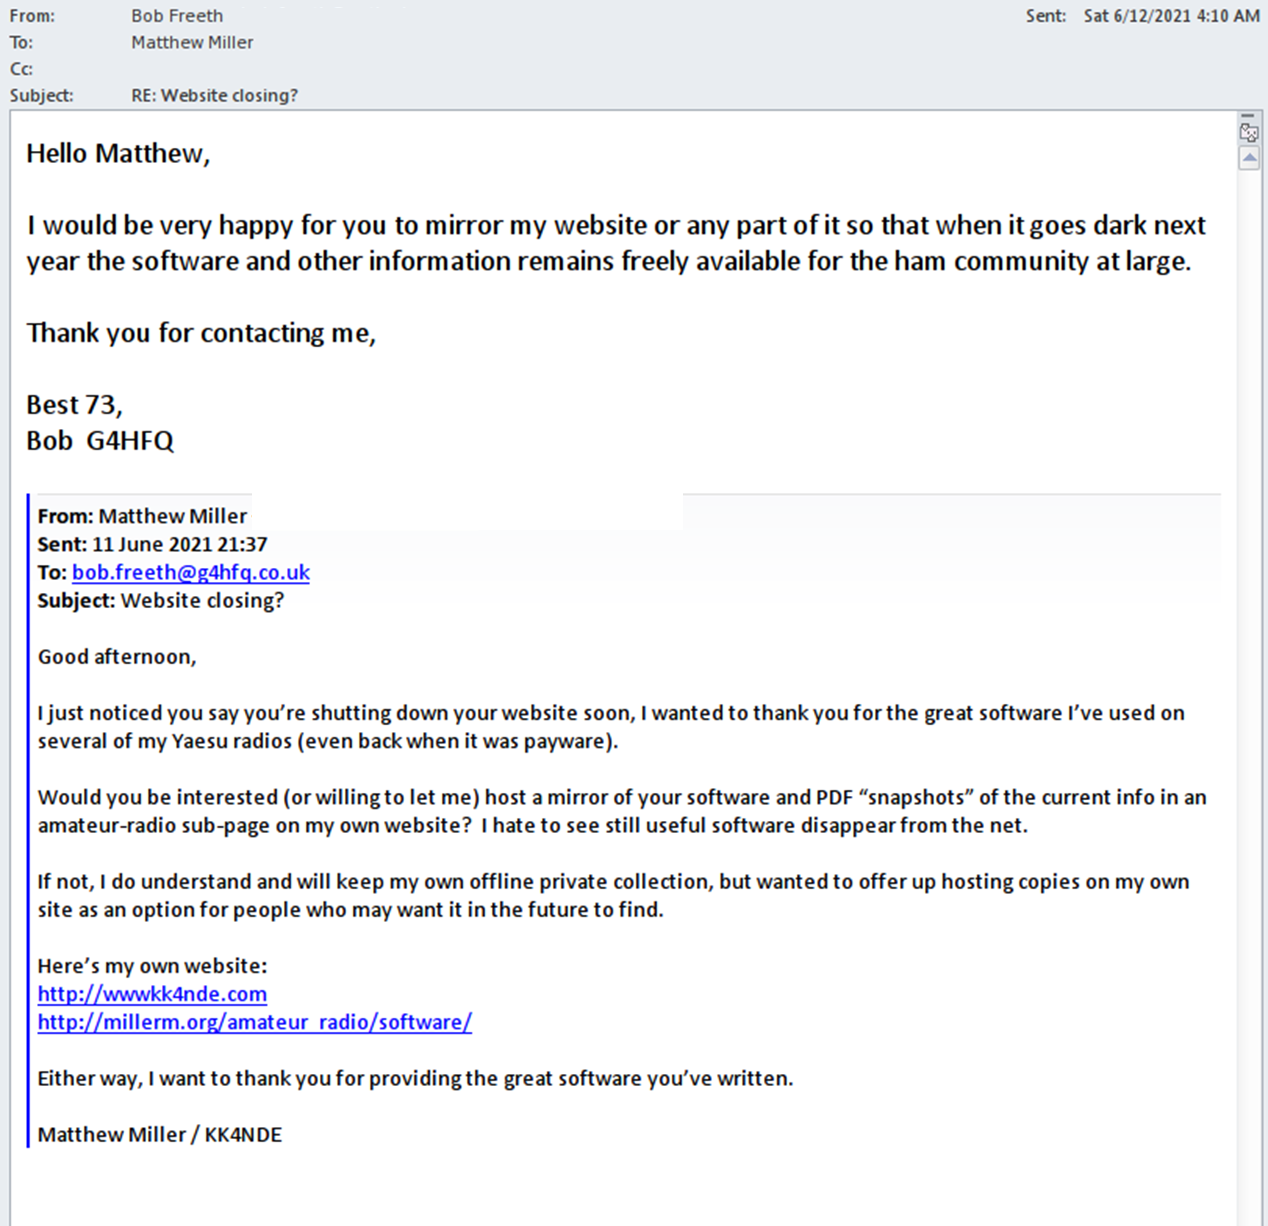