NOTE: This website is a static copy that has been archived on KK4NDE's website June 12, 2021 with the permission of G4HFQ to preserve the content before his site is shut down.

Memory Management Overview

Contents - Index - Previous - Next


Memory Management Overview


The complete status of the FT-60 configuration and memories can be read into the computer and  saved to disk. Any saved file can be subsequently reloaded into the computer and sent back to the radio. The program uses the radio's ability to clone configurations from one radio to another.

It is strongly recommended that before reloading any changed memories you produce several backup copies of your FT-60's memory and save them in a safe place - perhaps on an external storage device. These backups will give you a safe way to restore your radio to its original state in the event of any difficulty.

By setting up various configurations of memory settings you can build up a library  of different configurations that you can load into the radio as required.

Warnings:
 
  • Do NOT edit a saved file with an editor program and then reload it into the radio.
  • Loading your radio with a clone file from another person's radio is not recommended. To get the memory definitions from another person's radio image use the Export facility of the program on his image, and then Import the desired memories into an image taken from your own radio. 

    Modified radios:

    In addition to country-specific firmware the TX/RX coverage is determined by a diode/resistor pattern within the radio. Frequently this pattern is modified in order to change the coverage. When a clone is performed the sending radio supplies its radio type to the recipient to indicate the state of its hardware pattern. The recipient radio will refuse to talk to any radio type that does not match its own setting.

    If you have two radios, one of which is modified, it is not possible to write the same configuration to both radios because of the different diode/resistor pattern. In such circumstances there is a means of changing the radio type to match the clone image to the target radio. This can also occur if you use the Sample Memories file, which may not match the radio type of your own radio.
  • Determine the recipient radio type by performing a read from the radio - the type will be shown at the top right of the screen.
  • Load into the program the image you wish to write to this radio
  • Click on the words Rig type - a drop-down list will appear to the left.
  • Choose the required type - the drop-down list will disappear and the chosen type displayed.
  • Write to the radio - the clone should be accepted.

    This facility does not change the recipient radio's type. It can only force the clone image to be a match for the recipient radio.

    If the required type is not available in the drop-down list then please contact the author.

    Initial Screen

    The initial start-up screen is shown below. Before you can make any entries in the grid you must first load a memory image into the program.  This can be done either by using the Read FT60 button to read from your radio, or by using the Read Disk File button to read a previously saved memory image file from disk.


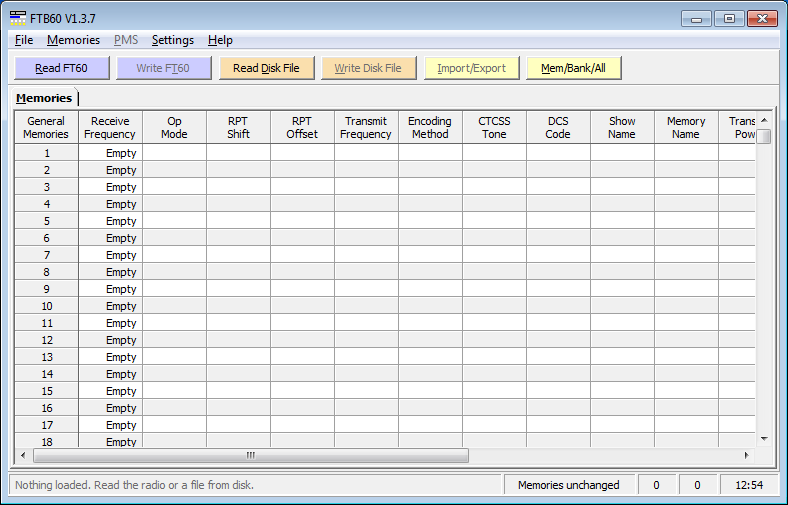
    At the top part of the screen a number of buttons are shown.

    Read FT60 read the memories/settings

    Write FT60 write the currently shown memories/settings to the FT-60

    Read Disk File read previously saved memories/settings

    Write Disk File save the currently shown memories/settings to disk

    Import/Export Import/Export memory definitions using an external CSV file.

    Mem/Bank/All switch viewing between Memories, Banks or both 

    A Status Bar is at the bottom of the screen. If you have loaded a file from disk then its name is shown in the status bar on the left, and the message on the right tells you if you have made any changes to the memories shown in the grid.

    Column Descriptions

    General Memories Memory number

    Receive Frequency Receive frequency in MHz - typed number

    Op Mode Operating mode - drop-down selection

    RPT Shift Repeater shift - drop-down selection. For split frequency operation choose Split. 

    RPT Offset Repeater offset in MHz - typed number

    Transmit Frequency Transmit frequency in MHz - typed number. Only entered if Op Mode is Split.

    Encoding Method CTCSS/DCS encoding method - drop-down list

    CTCSS Tone CTCSS tone - drop-down list

    DCS Code DCS code - drop-down list

    Show Name Whether to show the Name or Freq of a memory - drop-down list

    Memory Name Memory name - maximum of 6 typed characters

    Transmit Power Transmit power - drop-down list

    Scan Skip Whether the memory channel is to be skipped during scanning (Skip) or whether the memory channel is Preferential (Pref), or whether the memory channel is not specially flagged (Off) - drop-down list.

    Tuning Step Tuning step - drop-down list

    Clk Shift Whether the clock shift feature is On or Off - drop-down list

    Memory Description A description of the memory. This field is not stored in the radio. This field can also contain page formatting commands - see the section on Printing on how to control page skipping and section headings.

    Bank 1-n Indicators of whether or not the memory is present in a bank. Any non-blank character will be entered as an X to indicate the memory is in the bank. Entering and clearing the X indicators can be done using the keyboard or by highlighting a block of cells to be changed and using the commands Memories/Fill with Bank selected X's, or Memories/Empty of Bank selected X's (shortcuts CTRL+B and CTRL+E)
    NOTE: This website is a static copy that has been archived on KK4NDE's website June 12, 2021 with the permission of G4HFQ to preserve the content before his site is shut down.